Wet application of wall covering involves using water or adhesive to activate the backing, allowing easier alignment and repositioning, which ensures a smoother finish and reduces bubbles. Dry application requires pre-pasted or self-adhesive materials, offering quicker installation but less flexibility during placement, making precision crucial. Choosing between wet and dry methods depends on the specific wall covering type, surface conditions, and desired durability.
Table of Comparison
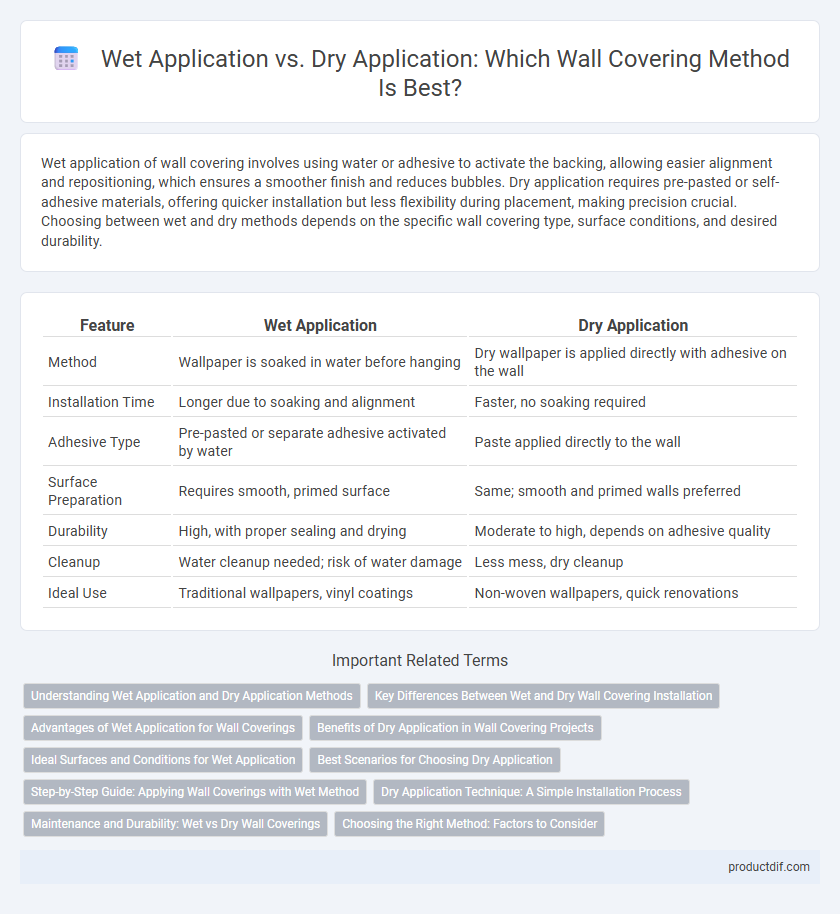
| Feature | Wet Application | Dry Application |
|---|---|---|
| Method | Wallpaper is soaked in water before hanging | Dry wallpaper is applied directly with adhesive on the wall |
| Installation Time | Longer due to soaking and alignment | Faster, no soaking required |
| Adhesive Type | Pre-pasted or separate adhesive activated by water | Paste applied directly to the wall |
| Surface Preparation | Requires smooth, primed surface | Same; smooth and primed walls preferred |
| Durability | High, with proper sealing and drying | Moderate to high, depends on adhesive quality |
| Cleanup | Water cleanup needed; risk of water damage | Less mess, dry cleanup |
| Ideal Use | Traditional wallpapers, vinyl coatings | Non-woven wallpapers, quick renovations |
Understanding Wet Application and Dry Application Methods
Wet application methods involve applying wallpaper paste directly to the wall or the back of the wallpaper, allowing for easier repositioning and smoother adhesion, ideal for heavier or textured wall coverings. Dry application uses pre-pasted wallpaper activated by water, simplifying installation but requiring precise soaking and timing to prevent bubbles or peeling. Understanding these differences helps select the best approach based on wall surface, wallpaper type, and desired finish for optimal durability and aesthetic appeal.
Key Differences Between Wet and Dry Wall Covering Installation
Wet wall covering application involves using adhesives or water-activated pastes to adhere materials like paper or fabric to surfaces, ensuring better conformity to textured walls and reducing air bubbles. Dry application utilizes pre-pasted or peel-and-stick wall coverings, offering quicker installation without drying time but often requires smoother wall surfaces for optimal adhesion. Choosing between wet and dry methods depends on wall texture, installation speed, and the type of wall covering material.
Advantages of Wet Application for Wall Coverings
Wet application of wall coverings ensures superior adhesion, reducing the risk of bubbles and peeling over time. This method allows the adhesive to penetrate surfaces more effectively, enhancing durability and providing a smoother finish. Moisture activation also facilitates easier repositioning during installation, resulting in precise alignment and reduced waste.
Benefits of Dry Application in Wall Covering Projects
Dry application in wall covering projects offers enhanced precision and cleaner installation, reducing material waste and ensuring a durable finish. This method minimizes drying time and eliminates the risk of adhesive seepage, which prevents damage to wall surfaces and surrounding areas. The resulting efficiency and neatness make dry application ideal for fast-paced or high-quality interior design projects.
Ideal Surfaces and Conditions for Wet Application
Wet application of wall coverings is ideal for porous and absorbent surfaces such as plaster, drywall, and concrete, where moisture can be effectively absorbed to aid adhesion. This method suits environments with stable temperature and moderate humidity levels to ensure proper drying without bubble formation. Smooth, clean, and structurally sound walls enhance the bonding of wet-applied materials, preventing peeling and extending the longevity of the wall covering.
Best Scenarios for Choosing Dry Application
Dry application of wall coverings is best suited for delicate or textured surfaces where moisture could cause damage or distortion. It is ideal for materials like vinyl or fabric-backed wallpapers that require precise alignment without shrinkage risks. This method also benefits quick installation projects in environments sensitive to humidity or condensation.
Step-by-Step Guide: Applying Wall Coverings with Wet Method
Begin the wet application of wall coverings by preparing the surface to ensure it is clean, smooth, and free from dust or grease. Apply a suitable adhesive evenly on the wall or the back of the wall covering using a roller or brush, then carefully position the wallpaper, smoothing out air bubbles with a wallpaper brush or squeegee. Allow the adhesive to dry according to manufacturer instructions before trimming excess edges and finishing seams for a flawless wall covering installation.
Dry Application Technique: A Simple Installation Process
Dry application technique for wall coverings offers a straightforward installation process that eliminates the need for water or adhesive mixing, reducing mess and drying time. This method commonly uses self-adhesive or peel-and-stick wallpaper materials that adhere directly to clean, smooth surfaces, making it ideal for DIY projects and quick renovations. The simplicity and reduced preparation steps significantly improve efficiency and minimize installation errors compared to traditional wet application methods.
Maintenance and Durability: Wet vs Dry Wall Coverings
Wet application wall coverings, such as traditional wallpapers applied with adhesive paste, offer strong initial adhesion but may require careful maintenance to prevent moisture damage and peeling over time. Dry application options like peel-and-stick vinyl or fabric panels provide easier maintenance with enhanced moisture resistance and quicker repairs, increasing overall durability in humid or high-traffic environments. Choosing between wet and dry wall coverings depends on the desired balance of long-term durability, ease of upkeep, and environmental conditions.
Choosing the Right Method: Factors to Consider
When selecting between wet and dry application methods for wall coverings, consider factors such as surface type, environmental conditions, and material compatibility. Wet application suits porous or uneven surfaces, promoting strong adhesion through moisture activation, while dry application is ideal for smooth, dry walls needing quick installation without extra drying time. Evaluating room humidity, wall texture, and desired durability ensures the chosen method enhances finish quality and longevity.
Wet application vs Dry application Infographic