LVT installation involves laying down luxury vinyl tiles that often feature a rigid core, providing enhanced durability and resistance to moisture, making it ideal for pet owners concerned about spills and accidents. LVP installation uses luxury vinyl planks, which mimic hardwood flooring and typically require precise alignment for a seamless appearance while offering similar waterproof properties. Both LVT and LVP installations require proper subfloor preparation and can be completed using click-lock or glue-down methods, with LVT generally providing more design flexibility due to its tile format.
Table of Comparison
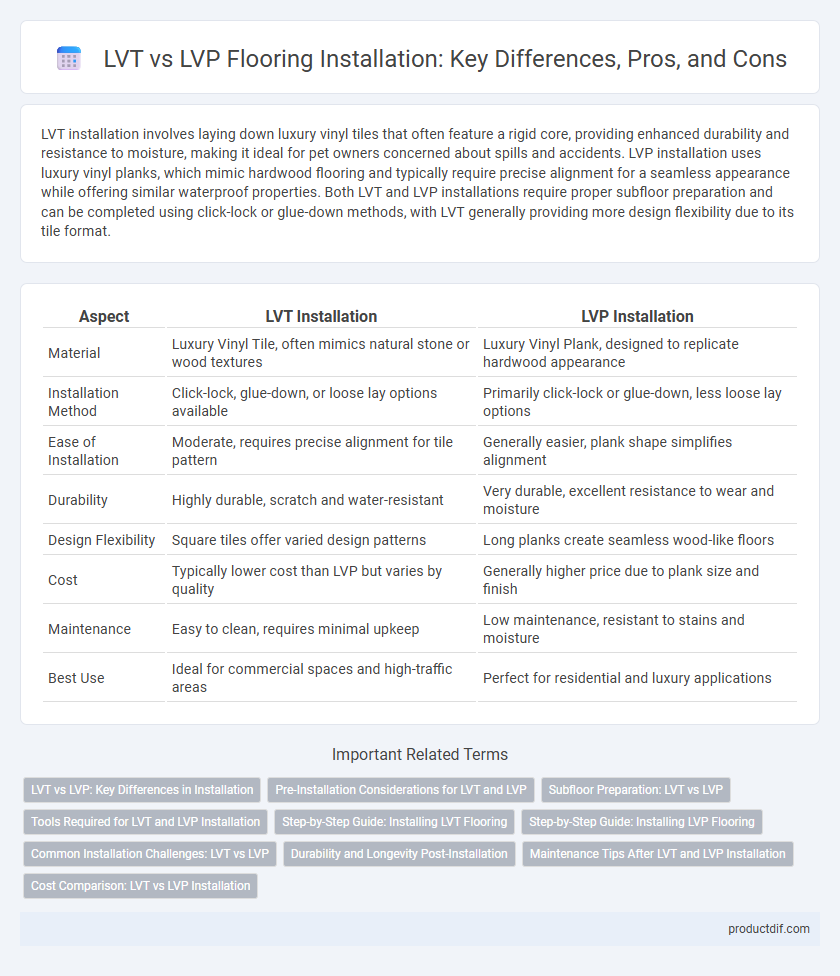
| Aspect | LVT Installation | LVP Installation |
|---|---|---|
| Material | Luxury Vinyl Tile, often mimics natural stone or wood textures | Luxury Vinyl Plank, designed to replicate hardwood appearance |
| Installation Method | Click-lock, glue-down, or loose lay options available | Primarily click-lock or glue-down, less loose lay options |
| Ease of Installation | Moderate, requires precise alignment for tile pattern | Generally easier, plank shape simplifies alignment |
| Durability | Highly durable, scratch and water-resistant | Very durable, excellent resistance to wear and moisture |
| Design Flexibility | Square tiles offer varied design patterns | Long planks create seamless wood-like floors |
| Cost | Typically lower cost than LVP but varies by quality | Generally higher price due to plank size and finish |
| Maintenance | Easy to clean, requires minimal upkeep | Low maintenance, resistant to stains and moisture |
| Best Use | Ideal for commercial spaces and high-traffic areas | Perfect for residential and luxury applications |
LVT vs LVP: Key Differences in Installation
LVT (Luxury Vinyl Tile) installation typically requires precise subfloor preparation and may involve glue-down methods for enhanced durability, while LVP (Luxury Vinyl Plank) often features click-lock or floating installation systems allowing for easier, faster DIY setups. LVT tends to demand more exact alignment and sealing due to its tile format, contrasting with LVP's plank design that mirrors hardwood installation techniques with greater flexibility. Understanding these differences is crucial for selecting the appropriate flooring based on skill level, location, and expected wear.
Pre-Installation Considerations for LVT and LVP
Pre-installation considerations for LVT (Luxury Vinyl Tile) and LVP (Luxury Vinyl Plank) include assessing subfloor conditions, as both require a clean, dry, and level surface to ensure optimal adhesion and durability. Moisture testing is critical, particularly in basements or concrete slabs, to prevent issues like mold or warping under LVT or LVP flooring. Proper acclimation of planks or tiles to room temperature for 48 hours stabilizes material expansion and contraction, enhancing long-term performance.
Subfloor Preparation: LVT vs LVP
Subfloor preparation for LVT (Luxury Vinyl Tile) typically demands a smoother, more level surface due to its rigid structure, requiring grinding or patching to eliminate imperfections larger than 3/16 inch. LVP (Luxury Vinyl Plank) installation tolerates minor subfloor irregularities better because of its flexible core, but still benefits from a clean, dry, and flat base to prevent issues like cracking or warping. Both materials necessitate moisture testing and proper acclimation of flooring planks or tiles to ensure a durable and stable installation.
Tools Required for LVT and LVP Installation
LVT installation requires precision tools such as a utility knife for cutting, a tapping block to ensure tight seams, and a roller for securing adhesive-backed planks. LVP installation also involves cutting tools like a vinyl cutter or utility knife, but typically demands fewer adhesive tools since many LVP products feature click-lock systems. Both installation processes benefit from a straight edge, measuring tape, and spacers to achieve accurate alignment and a professional finish.
Step-by-Step Guide: Installing LVT Flooring
Installing LVT flooring begins with preparing the subfloor, ensuring it is clean, dry, and level to avoid imperfections beneath the surface. Next, the planks or tiles are acclimated to room temperature for 48 hours, then laid out in the desired pattern, followed by locking or adhesive application depending on the LVT type. Final steps include trimming edges for a perfect fit, rolling the floor to secure adhesion, and allowing the flooring to settle before heavy use, optimizing durability and appearance.
Step-by-Step Guide: Installing LVP Flooring
Installing LVP flooring begins with thorough subfloor preparation, including cleaning, leveling, and moisture testing to ensure a smooth base. The next steps involve laying down an underlayment if required, measuring and cutting the luxury vinyl planks precisely, and clicking or gluing them together according to the product specifications. Final touches include rolling the floor to ensure adhesion, installing trim and transition pieces, and allowing the floor to acclimate for optimal durability and finish.
Common Installation Challenges: LVT vs LVP
LVT installation often encounters challenges such as subfloor preparation requirements and precise locking mechanisms, which demand careful alignment to avoid gaps. LVP installation is typically more forgiving but can face issues like plank expansion and contraction due to temperature fluctuations, requiring acclimation before installation. Both materials require clean, level surfaces, but LVT's complexity in locking systems generally makes it more sensitive to installation errors compared to LVP.
Durability and Longevity Post-Installation
LVT installation offers superior durability due to its multi-layer construction, which includes a wear layer that resists scratches and stains, making it ideal for high-traffic areas. LVP installation, while also durable, generally has a thinner wear layer, which may reduce its longevity under heavy use but allows for easier repairs and replacements. Post-installation, LVT tends to maintain its appearance longer, providing better value over time in demanding environments.
Maintenance Tips After LVT and LVP Installation
Maintaining LVT (Luxury Vinyl Tile) and LVP (Luxury Vinyl Plank) flooring requires regular cleaning with a damp mop and a mild detergent to prevent dirt buildup that can scratch surfaces. Avoid using abrasive cleaners or wax-based products, as these can damage the wear layer and compromise the flooring's durability. Periodic inspections for grout or seam integrity help prolong the lifespan of both LVT and LVP installations, ensuring a long-lasting, attractive floor.
Cost Comparison: LVT vs LVP Installation
LVT installation generally incurs higher costs than LVP due to its thicker wear layer and enhanced design features, leading to increased material and labor expenses. LVP offers a more budget-friendly installation option with simpler click-lock systems that reduce labor time and overall costs. Contractors and homeowners often prefer LVP for cost-effective flooring solutions without significant compromises in durability or appearance.
LVT Installation vs LVP Installation Infographic