Dry felting involves shaping wool fibers using a barbed needle to interlock them, allowing for precise and detailed designs ideal for small craft projects and three-dimensional sculptures. Wet felting requires agitating wool fibers with warm water and soap, which causes them to mat together into a dense fabric suitable for larger, flat items like scarves and mats. Choosing between dry felting and wet felting depends on the desired texture, complexity, and size of the craft project.
Table of Comparison
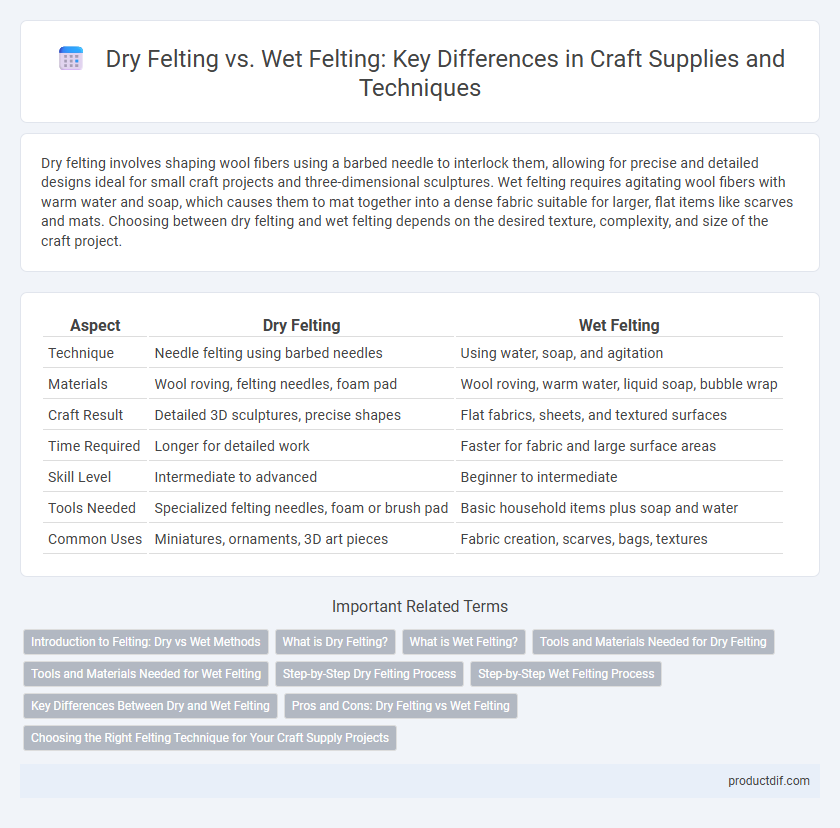
| Aspect | Dry Felting | Wet Felting |
|---|---|---|
| Technique | Needle felting using barbed needles | Using water, soap, and agitation |
| Materials | Wool roving, felting needles, foam pad | Wool roving, warm water, liquid soap, bubble wrap |
| Craft Result | Detailed 3D sculptures, precise shapes | Flat fabrics, sheets, and textured surfaces |
| Time Required | Longer for detailed work | Faster for fabric and large surface areas |
| Skill Level | Intermediate to advanced | Beginner to intermediate |
| Tools Needed | Specialized felting needles, foam or brush pad | Basic household items plus soap and water |
| Common Uses | Miniatures, ornaments, 3D art pieces | Fabric creation, scarves, bags, textures |
Introduction to Felting: Dry vs Wet Methods
Dry felting, also known as needle felting, uses barbed needles to interlock wool fibers by repeatedly poking them, allowing for precise shaping and sculpting of wool objects. Wet felting involves applying warm soapy water and pressure to wool fibers, causing them to mat and shrink into a dense fabric suitable for creating flat textiles or seamless items. Both felting methods utilize natural wool fibers but differ in technique, texture, and ideal project types within the craft supply domain.
What is Dry Felting?
Dry felting, also known as needle felting, involves repeatedly poking wool fibers with a barbed needle to interlock and shape them into firm, three-dimensional forms. This technique allows for precise sculpting of wool without the use of water or soap, making it ideal for detailed craft projects such as figurines, ornaments, and textured art pieces. Dry felting offers greater control over fiber placement compared to wet felting, which relies on moisture and agitation to bind fibers together.
What is Wet Felting?
Wet felting involves combining layers of wool fibers with water, soap, and agitation to create a dense, durable fabric. The process uses hot soapy water and rhythmic rubbing or rolling to mat the fibers together, resulting in a strong, compact material ideal for crafts and textiles. This technique contrasts with dry felting, which relies on needle agitation without moisture to shape wool.
Tools and Materials Needed for Dry Felting
Dry felting requires essential tools such as barbed felting needles, a foam or sponge pad, and wool roving or batting made from natural fibers like merino or alpaca. Unlike wet felting, dry felting does not involve water or soap, relying on repeated needle piercing to interlock fibers and shape the material. Specialized needle holders and varying needle gauges enhance precision and detail in dry felting projects, making the choice of tools critical for successful crafting.
Tools and Materials Needed for Wet Felting
Wet felting requires specific materials such as wool roving, warm soapy water, and bubble wrap or a bamboo mat to aid in the felting process. Essential tools include a spray bottle for applying water evenly, a bar of soap for creating friction, and a wooden rolling pin or hands for agitating the wool fibers. Unlike dry felting, which primarily uses felting needles, wet felting relies heavily on moisture and pressure to interlock the fibers effectively.
Step-by-Step Dry Felting Process
Dry felting, also known as needle felting, involves repeatedly poking wool fibers with a barbed needle to interlock and shape them into a dense fabric or sculpted object. The step-by-step dry felting process starts with selecting high-quality wool roving or batting, then using a specialized felting needle to carefully stab the wool, compacting the fibers and forming the desired shape. This technique requires patience and precision, as continuous stabbing aligns and locks the fibers together, producing detailed and sturdy felt creations without the use of water or soap.
Step-by-Step Wet Felting Process
Wet felting involves layering wool fibers, applying warm soapy water, and agitating the material to interlock the fibers into a dense fabric. This step-by-step wet felting process includes laying out the wool evenly, adding soap and water, rolling or rubbing the fibers vigorously, and rinsing to set the felt. The technique produces sturdy, textured felt suitable for crafting items like bags, hats, and decorative pieces.
Key Differences Between Dry and Wet Felting
Dry felting involves using a barbed needle to interlock wool fibers by repeatedly stabbing, creating detailed and sculptural designs without water. Wet felting requires hot water, soap, and agitation to mat the fibers together, producing a denser and more durable fabric ideal for flat or large projects. The key differences lie in technique, texture, and application, with dry felting offering precision and wet felting providing firmness and flexibility.
Pros and Cons: Dry Felting vs Wet Felting
Dry felting offers precise control and detailed sculpting, ideal for creating intricate shapes and small embellishments, but can be time-consuming and requires specialized needles. Wet felting allows for faster production of larger, durable fabric pieces by using soap, water, and agitation, yet it offers less detailed control and can be messy. Both methods have unique advantages suited to different craft projects, with dry felting favoring fine detail and wet felting excelling in creating robust textiles.
Choosing the Right Felting Technique for Your Craft Supply Projects
Dry felting uses barbed needles to interlock wool fibers, offering precision ideal for intricate designs and small details in craft supply projects. Wet felting relies on hot water, soap, and agitation to bond fibers, making it suitable for creating sturdy, textured fabric pieces. Selecting the right felting technique depends on project size, desired texture, and level of detail needed for the craft supply creation.
Dry felting vs Wet felting Infographic