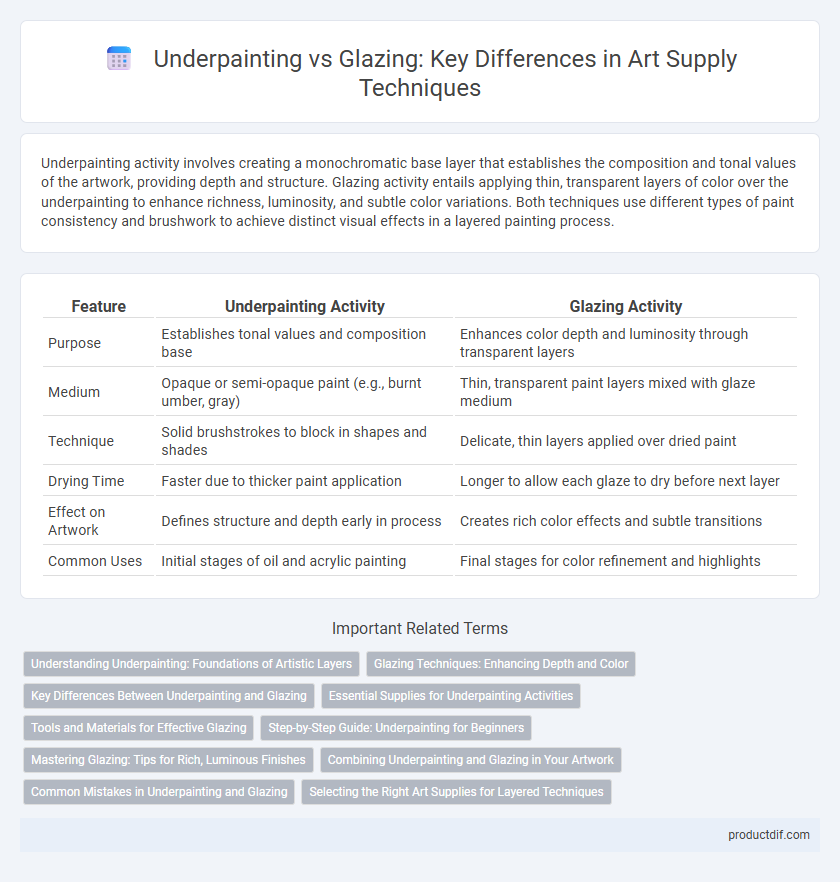
Underpainting activity involves creating a monochromatic base layer that establishes the composition and tonal values of the artwork, providing depth and structure. Glazing activity entails applying thin, transparent layers of color over the underpainting to enhance richness, luminosity, and subtle color variations. Both techniques use different types of paint consistency and brushwork to achieve distinct visual effects in a layered painting process.
Table of Comparison
| Feature | Underpainting Activity | Glazing Activity |
|---|---|---|
| Purpose | Establishes tonal values and composition base | Enhances color depth and luminosity through transparent layers |
| Medium | Opaque or semi-opaque paint (e.g., burnt umber, gray) | Thin, transparent paint layers mixed with glaze medium |
| Technique | Solid brushstrokes to block in shapes and shades | Delicate, thin layers applied over dried paint |
| Drying Time | Faster due to thicker paint application | Longer to allow each glaze to dry before next layer |
| Effect on Artwork | Defines structure and depth early in process | Creates rich color effects and subtle transitions |
| Common Uses | Initial stages of oil and acrylic painting | Final stages for color refinement and highlights |
Understanding Underpainting: Foundations of Artistic Layers
Underpainting forms the essential foundation of artistic layers, providing tonal values and composition structure that guide subsequent glazing activities. This preliminary layer often uses monochromatic hues such as burnt umber or ultramarine blue to establish depth and contrast before applying translucent glazes. Mastering underpainting techniques enhances the luminosity and dimensionality of the final artwork by reinforcing color harmony and visual coherence.
Glazing Techniques: Enhancing Depth and Color
Glazing techniques in art supply involve applying thin, transparent layers of paint over a dried underpainting to enhance depth and color luminosity. Using specialized glazing mediums increases light refraction and richness, allowing artists to achieve subtle color shifts and intensify shadows without obscuring underlying details. Mastering glazing activities requires patience and precision, as each layer contributes to the overall tonal complexity and vibrancy of the artwork.
Key Differences Between Underpainting and Glazing
Underpainting involves applying a monochromatic base layer to establish composition, values, and tonal range, often using opaque or semi-opaque paints like burnt umber or ultramarine blue. Glazing is the technique of layering transparent or semi-transparent colors over a dried underpainting to enhance depth, luminosity, and color richness, typically utilizing oil or acrylic glazes with slow-drying mediums. The key differences lie in opacity, timing, and purpose: underpainting serves as the structural foundation with solid tones, while glazing builds up color effects and vibrancy without obscuring the base layer.
Essential Supplies for Underpainting Activities
Essential supplies for underpainting activities include high-quality gesso or acrylic primer to prepare the surface, a limited palette of opaque, fast-drying paints such as burnt sienna or ultramarine blue, and a variety of brushes like flat and filbert shapes for creating smooth, even layers. Canvas or wood panels with a sealed surface ensure proper paint adherence and durability during the underpainting process. Palette knives and mixing trays are useful for blending pigments and controlling paint consistency in underpainting techniques.
Tools and Materials for Effective Glazing
Effective glazing in art requires transparent pigments, high-quality brushes with soft bristles, and a smooth, non-absorbent ground to ensure even application and light refraction. Unlike underpainting, which uses opaque paints and coarse textures to establish values and composition, glazing demands specialized materials such as slow-drying mediums or glazing liquids that enhance pigment luminosity and facilitate multiple translucent layers. Proper selection of these tools and materials directly influences the depth, vibrancy, and realism achievable through the glazing process.
Step-by-Step Guide: Underpainting for Beginners
Start with a toned canvas using a neutral color like burnt sienna or gray to establish values and composition in your underpainting. Apply thin, watered-down layers of paint with a brush, focusing on shapes, shadows, and highlights to create a monochromatic base. Allow the underpainting to dry completely before proceeding to glazing, where transparent layers add depth and color vibrancy.
Mastering Glazing: Tips for Rich, Luminous Finishes
Mastering glazing in art involves applying thin, translucent layers of paint over a fully dried underpainting to create depth and luminous color effects. Unlike underpainting, which establishes tonal values and composition with opaque layers, glazing enhances vibrancy and richness by allowing light to pass through multiple layers, reflecting off the base. To achieve rich, luminous finishes, artists should use high-quality, transparent pigments, maintain consistent glaze thickness, and ensure each layer is thoroughly dry before applying the next.
Combining Underpainting and Glazing in Your Artwork
Combining underpainting and glazing in your artwork enhances depth and luminosity by layering transparent glazes over a detailed monochromatic base. Underpainting establishes tonal values and composition, providing a solid foundation that intensifies the glazed colors applied on top. This technique allows artists to create rich textures and vibrant color transitions, elevating the overall visual impact of the painting.
Common Mistakes in Underpainting and Glazing
Common mistakes in underpainting include applying paint too thickly, causing longer drying times and loss of detail, and using overly dark tones that can overshadow subsequent glazes. In glazing activity, errors such as insufficient drying between layers and using incompatible paint mediums lead to muddied colors and poor adhesion. Mastering the balance of transparency and opacity is essential for achieving depth and vibrancy in both underpainting and glazing techniques.
Selecting the Right Art Supplies for Layered Techniques
Choosing the right art supplies for underpainting and glazing activities significantly impacts the quality of layered art techniques. For underpainting, artists typically select fast-drying, opaque paints like acrylics or oil-based primers to establish tonal values and form. In contrast, glazing requires transparent, slow-drying mediums such as oil or acrylic glazes combined with soft brushes and a smooth surface to build luminous, depth-rich layers effectively.
Underpainting Activity vs Glazing Activity Infographic